The Perfect Sugar Cookie


Impromptu parties are my favorite kind of party. And when they are held at a friend's home with a beautiful pool and most comfortable outdoor furniture, I am the first to jump at the invitation. With husbands' out-of-town and a hot summer evening, a burger and hot dog barbecue was an ideal opportunity to get together for an evening of swimming and eating.

After a quick morning phone call with the invite from my friend/hostess and talk of the menu for the night, I decided to bring a tortellini salad loaded with red and green peppers, cucumbers, olives, pepperonis, and cheese tortellini and The Perfect Sugar Cookie as my contributions to the festivities. The menu was rounded out with bacon and cheddar burgers, a pile of grilled hotdogs, and still crispy sour cream potato chips - even on a humid night.

The Perfect Sugar Cookie is my "go-to cookie" ever since I made 8 dozen of the buttery, sprinkle laden treats for a middle school event earlier this year. I have deemed this cookie perfect for a number of reasons.

1. 99% of the time I have all the ingredients on hand for the recipe.
2. It takes about 5 minutes to mix up the batter.
3. The cookies are "drop" cookies which means no rolling and cutting out.
4. They are the same size every time - a whopping 3 inches across.
5. The sprinkles cover the whole cookie after they are baked.
6. They are delicious.
7. The cookies come out perfect every time.

One young party guest proclaimed the The Perfect Sugar Cookie as the best cookie he had ever had. The next morning as I was unloading my cooking supplies and groceries for my Thursday personal chef client, I noticed that he even "wrote" a note on my not-so-clean rear window of my car thanking me for the cookies.

That was the best thank you note I have ever received. And even more testament that this is The Perfect Sugar Cookie.

The Perfect Sugar Cookie

adapted from this recipe

makes about 22

2/3 cup shortening
2/3 cup butter, at room temperature
1 1/2 cups sugar
2 eggs
1 teaspoon vanilla extract
3 3/4 cups flour
2 teaspoons baking powder
1 teaspoon salt
jimmies/sprinkles for decoration

Preheat oven to 350 degrees and line 2 baking sheets with parchment paper. Fill a shallow bowl with about 1 cup of the jimmies.

In the bowl of a standing mixer, cream together the butter, shortening and sugar. Beat in the eggs and vanilla. Combine the flour, baking powder and salt in bowl and gradually blend into the creamed mixture until dough comes together, about 2 - 3 minutes.

Use a 2 tablespoon scoop or roll dough into golf ball sized balls. Flatten slightly and dip in jimmies. Place 6 cookies on a baking sheet about 2 inches apart.

Bake cookies 10 to 12 minutes. Only the bottoms should be light brown. Remove cookies from baking sheet and cool on a piece of parchment paper on the counter.

Share/Bookmark

Black Bean and Summer Vegetable Enchiladas


Summer officially started yesterday, and the heat and humidity have settled in on the East Coast for the next few months. We will be adding a few vegetarian options to our dinner table and first up was Black Bean and Summer Vegetable Enchiladas.

Loaded with sauteed red peppers and zucchini, black beans, sweet corn, scallions and two kinds of cheese - spicy pepper jack and sharp cheddar - we did not even miss the usual chicken that fills our enchiladas. The sauce gets its kick from hot chili powder and a smokey taste from ground cumin. The enchiladas are quick to make and can be baked for dinner tonight, refrigerated for up to two days then baked, or frozen for 3 months and pulled from the freezer for a made-ahead dinner.

Black Bean and Summer Vegetable Enchiladas are one of my many quick dinner recipes that is ideal for those evenings when everyone in your family needs to eat dinner at a different time. The enchiladas can be prepared ahead of time and reheated as needed. 3 of the 5 of us ate the enchiladas for dinner. No Thank You Boy was tired from his day spent at football camp and a couple hours of lacrosse practice where he manned the goal. After his long day, he was not feeling like a very adventurous eater. Too many vegetables for him. I let him slide tonight and he opted for reheated deep dish pizza. The Husband, My Oldest and I all agreed that this recipe will be repeated many times. It has a kick, but not an over powering one. The Husband added some extra hot sauce to up the spiciness of his enchiladas.

The recipe makes a dozen enchiladas so we have 6 left in the refrigerator for a few quick lunches or dinners. I don't see them lasting past tomorrow.


Black Bean and Summer Vegetable Enchiladas
adapted from a recipe by Alexandra Ricciuti of Green Delicious Cooking Company

serves 6

1 1/2 teaspoons cumin
1/4 teaspoon hot chili powder
1/4 cup flour
1/4 cup tomato paste
1 (14 - ounce) can vegetable stock, reduced sodium
1/2 teaspoon kosher salt
2 teaspoons canola oil
3/4 cup red pepper, small dice
1 cup zucchini, small dice
2 cups grated pepper jack cheese
1 cup grated sharp cheddar cheese
1 (15 - ounce) can black beans, drained and rinsed
3/4 cup corn kernels
3 scallions, thinly sliced
12 (6-inch)flour tortillas (sub corn tortillas to make gluten free)
sour cream, for serving

To make the enchilada sauce, in a small saucepan, combine cumin, chili powder, flour, and tomato paste. Whisk to combine and cook for about 1 minute. Gradually whisk in stock, salt, and 3/4 cup water. Bring to a boil. Reduce heat and simmer for 3 - 5 minutes or until the sauce is slightly thickened. Remove from heat and set aside.

Heat a saute pan to medium high heat and add the canola oil. Add the red pepper and zucchini and saute for about 3 - 5 minutes. Remove from heat and place in a large bowl. Cool slightly. Add 1 cup of the pepper jack cheese, the cheddar cheese, black beans, corn, and scallions and stir to combine.

To assemble enchiladas, spray a 9 x 13 inch baking dish with cooking spray. Dip tortillas, one at a time, in the sauce. Place on a cutting board and fill with about 1/2 cup of the filling. Roll up tortilla and place seam side down in baking dish. Continue filling and rolling the remaining tortillas. Pour the sauce over the enchiladas and top with the remaining 1 cup of pepper jack cheese.

At this point, the enchiladas can be baked, refrigerated for up to 2 days, or frozen. To bake, place uncovered dish in a preheated 400 degree oven for 15 - 20 minutes until the cheese is melted and the enchiladas are heated through. Remove from oven and serve with sour cream if desired.

To freeze, cover baking dish with plastic wrap (I like to use Glad Press 'n Seal) and then foil. Freeze for up to 3 months. To bake, thaw for 24 hours in the refrigerator and bake as directed above.

Grilled Pork Tenderloin with Pepper Jelly Glaze


Facebook is a curious thing. After signing up for the service, you connect with others who have also joined Facebook. Some people have only a few friends and others have 1,000s of friends. I find it hard to believe that anyone can have a 1,000 friends. How can you possibly keep track of that many people?

Some Facebookers are updating their status all day long. I need to limit my time on Facebook. It can suck you in and the next thing you know is it is 11:30 am and you are still in your pink fuzzy robe and the dogs need to go out and you can't let the neighbors see you are still in your pink fuzzy robe at 11:30 am.

I have 3 pages on Facebook. One is my personal page on which I "update my status." I usually chat about earth-shaking tidbits such as the robin's nest on my windowsill, what I am eating for breakfast when I should be exercising, or an article on organic foods I think others may find interesting. My second page is for my business - EAT! A Personal Chef Business. Updates on this page include menus I prepare for my clients, new services I offer, and the occasional podcast of a radio interview I do. My third page is for my blog which your are reading now. On this Facebook page, I recommend recipes for dinner and update what is cooking in my kitchen.

I have 270 friends on Facebook and I personally know about 90% of them. The ones I have not met are "famous" chefs or cookbook authors that I pretend are my friends, a few personal chefs from around the United States, and some of my blog readers who I feel like I know. One such person I "friended" lives in Texas and only knows me through my blog and Facebook. This person has left comments for me on Facebook and even sent me some of the jalapeno jelly she made from vegetables she grows on the family farm.


In this day and age, it is comforting to know that this person just sent me some jalapeno jelly for no reason other than to be nice. She didn't want me to link to her blog or mention her farm or anything. She just sent me some of her homemade jalapeno jelly to try.


I have enjoyed the jelly with brie and water crackers. And I have spread it on my morning toast for a little jump start to my day. I decided to try it in a recipe for dinner. Grilled Pork Tenderloin with Pepper Jelly Glaze was delicious! No Thank You Boy commented that the spicy cherry pepper slices hit your taste buds and compliments the the sweetness of the glaze on the grilled pork. Whoa! This unsolicited review from a kid who usually says, "it's good" when asked if he likes what I have made for dinner. My girls passed on the hot cherry peppers and liked the slight kick from the pepper jelly in the glaze. The Husband came home late and tired from work. He ate dinner without much fanfare and few comments. I take it that he liked it.

Grilled Pork Tenderloin with Pepper Jelly Glaze was served with sauteed spinach and roasted Parmesan cauliflower (florets drizzled with olive oil and tossed with seasoned bread crumbs and grated Parmesan cheese and roasted at 425 degrees for 15 - 20 minutes). This dinner is one that can be made ahead of time and reheated when ready to serve.

Thanks for the pepper jelly Camille! It is refreshing to know there are just nice people in the world. If I ever am in Joaquin, Texas, I am stopping by to say hi and I will be bringing you a few dozen cookies too.

Grilled Pork Tenderloin with Pepper Jelly Glaze

serves 5

1 pork tenderloin, about 1 1/2 lbs
olive oil
salt
pepper
2 tablespoons butter
1 tablespoon flour
1/4 cup white wine
1/2 cup chicken stock
1/3 cup pepper jelly - available at most grocery stores and specialty food markets
1 tablespoon Worcestershire sauce
1 teaspoon Dijon mustard
sliced hot cherry peppers - for serving

Heat a grill to medium high heat.

Meanwhile, heat a saute pan to medium high and add the butter. As soon as the butter is melted and foaming, whisk in the flour. Cook for 1 minute. Whisk in the wine and cook an additional minute. Add the chicken stock and pepper jelly and stir the glaze until the jelly melts. Stir in Worcestershire sauce and mustard. Remove from heat. Divide the glaze in half - half will be used to glaze the tenderloin while it grills and the remainder will be served with the sliced tenderloin. Reheat the glaze before serving.

Rub the tenderloin with olive oil and generously sprinkle with salt and pepper.
Place the tenderloin on the grill and grill for about 5 minutes. Since a pork tenderloin is basically tubular in shape, you will want to roll it on all four sides to cook evenly. The tenderloin should not stick when you roll it to the next side to be grilled. Roll the tenderloin and continue grilling for 5 minutes. As the tenderloin is rolled on the grill, brush the top side with the glaze. Grill for 5 minutes on each of the remaining sides and until the internal temperature reaches about 140 degrees. Remove tenderloin from the grill, tent with foil and let rest for 10 minutes before slicing.

To serve, slice the tenderloin in medallions and pass the remaining glaze and sliced cherry peppers.

East West Barbecued Chicken in the Crock Pot


I don't think of my crock pot for summer time meals. But after reading a few slow cooker recipes in the latest issue of Woman's Day magazine, I decided it was time to drag out the crock pot.

East West Barbecued Chicken is definitely going into our menu rotation for the warm summer months. The sweet and spicy chicken recipe is not as heavy as some typical slow cooker recipes for winter time stews and chilis. The oh-so-moist chicken is covered in a Asian style barbecue sauce that is highlighted with sweet onions.

As with most dinners around our house, we ate in shifts. My Middle One and I ate first and couldn't get enough of the onions. Our dinner was paired with a noodle salad which combined a half pound of cooked and drained linguine tossed with 3 tablespoons of soy sauce, a couple teaspoons of sesame oil, a tablespoon of rice wine vinegar, a cup each of steamed broccoli, green beans, and yellow pepper, and a few shakes of sesame seeds and red pepper flakes.

No Thank You Boy, his buddy Two Scoops, and My Oldest ate later in the evening and devoured the rest of the chicken. The boys were not big fans of the vegetables in the salad. They both said, "No thank you" when I asked if they wanted something green with their noodles. They added a few generous shakes of hot sauce to their chicken because they like living on the spicy side of life.

There were no leftovers from our dinner of East West Barbecued Chicken, and I will be making this many more times this summer.

East West Barbecued Chicken in the Crock Pot

Serves 4

2 medium onions, sliced, about 2 cups
2 chicken breasts, bone-in and skin on
5 chicken drumsticks, bone-in and skin on
1 cup spicy barbecue sauce such as Sweet Baby Ray's Sweet 'n Spicy
1/4 cup soy sauce
3 tablespoons Worcestershire sauce
4 garlic cloves, smashed
1/4 cup orange juice
1 tablespoon cornstarch
hot sauce, for serving

Place sliced onions in the crock pot and top with the chicken.

In a small bowl, combine the barbecue sauce, soy sauce, Worcestershire sauce, garlic, and orange juice. Pour over the chicken.

Cover the crock pot and cook on high for 4 - 5 hours or low for 7 - 8 hours.

When the cooking time is complete, remove the chicken to a platter and tent with foil to keep warm. In a small pot over medium high heat, add 1 cup of the sauce from the crock pot. In a small bowl combine the cornstarch with 2 tablespoons of cold water. Stir into the sauce in the pot and cook for 3 - 5 minutes until it is thickened. Pour the thickened sauce back into the crock pot and stir to combine. Spoon the sauce over the chicken and serve with extra hot sauce if desired.

The Ribs


It is never too early to plan for a weekend barbecue.


With the Memorial Day weekend winding down, our family had one last barbecue before the sun set on Monday. Ribs have been on our minds lately so I made a grocery list of 2 items for The Husband and No Thank You Boy.

2 slabs of baby back ribs
6 ears of corn


I had planned a menu of baby back ribs, sauteed sweet corn, grilled yellow squash and peppers, and garlic bread and only needed a few items from the store.

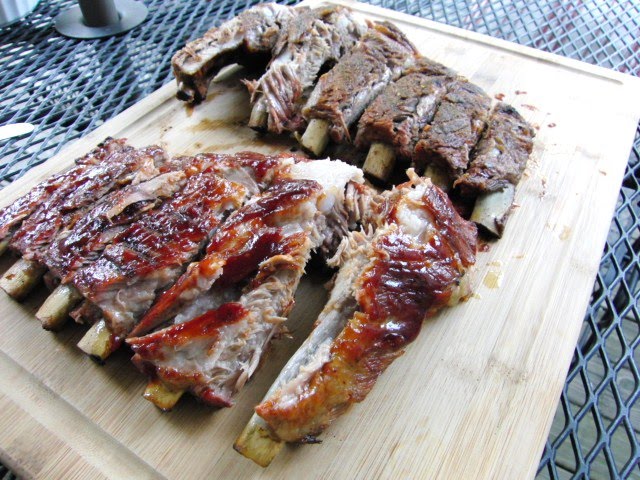
Being that it was late in the afternoon on the last day of the start of the barbecue season, there were no baby back ribs to be found. My shoppers picked up a mammoth slab of Fred Flintstone-sized pork spare ribs instead. The preparation of the meatier spare ribs is just like that of the smaller baby back ribs so dinner prep did not have to be altered.

The ribs are simmered in a couple bottles of beer for 2 hours until tender. After being rubbed with spices, the ribs are grilled. One slab is slathered with barbecue sauce and one is left with just the peppery, salty, and slightly sweet rub. The fresh corn saute takes about 10 minutes to prepare (recipe in a future post) and the squash and peppers grill along with the ribs. A long loaf of bread is spread with butter and browned in the oven. The toasted bread gets a quick rub with a couple halved garlic cloves, and dinner is served on the deck.

We all loved the meatier ribs. As baby back rib devotees, this unplanned dining diversion was a success. I surprised that the ribs with just the spice rub were hit. Typically, we love our ribs all sauced up. With My Middle One and No Thank You Boy polishing off the loaf of garlic bread, I will remember to make a larger loaf next time so I get a slice.


Note about eating grilled peppers -- I picked up a dozen or so long hot peppers for the Shrimp Kebabs with Thai Ginger-Chile Marinade I made for a weekend party. With a handful left in my refrigerator, I had The Husband grill them along with the yellow squash. When dinner was served, the first thing he ate was a whole pepper. Big mistake. Colossal mistake. He can eat the hottest salsas and tops almost everything with hot sauce, but this pepper had him downing glasses of milk and chomping on endless ice cubes. With his mouth on fire and eyes watering, he almost couldn't enjoy our rib dinner because of the pain the pepper caused.

A friendly reminder to pepper lovers - a small bite goes a long way.


Barbecued Spare Ribs 2 Ways

serves 4

1 slab of pork spare ribs - about 4 pounds
2 bottles of beer
1 large onion, sliced

for rub --
2 teaspoons salt
2 teaspoon sugar
1 teaspoon pepper
1 teaspoon paprika
1/4 teaspoon nutmeg
1/2 teaspoon sage
1/2 teaspoon cayenne pepper
1 teaspoon chili powder

1 cup of your favorite barbecue sauce such as Sweet Baby Ray's

Cut ribs into 2 smaller slabs with about 6 ribs each. Trim any excess fat. Pull off the membrane on the underside of the ribs.

Place ribs in a large stock pot and add the beer, onion and enough water to just cover. Bring to a boil and then cover and reduce the heat to simmer. Cook for about 2 hours. The meat should begin to pull away from the bone but still be attached. Remove ribs from pot.

In a small bowl, combine the ingredients for the rub. Rub both sides of the ribs with the spice mixture. Set aside.

Meanwhile, heat a grill to medium high. Slather one slab of ribs with the barbecue sauce while leaving the other slab with just the spice rub. Grill ribs for about 6 - 8 minutes on one side. Flip both slabs over and slather the sauced slab on the other side. Continue grilling for and additional 5 - 6 minutes. Remove ribs from grill and slice between the bones to serve.

Baked Eggs in Ham Crisps

Baked Eggs in Ham Crisps
Breakfast is the most important meal of the day - along with lunch and dinner.

An ideal morning meal for me is two eggs over easy with toast, orange juice and coffee. It is simple to make and filling enough so I am not hungry within an hour. Even though I love this breakfast, the inquisitive cook in me is always on the lookout for a new preparation for an old favorite.

I have come across many recipes for baked eggs, and a recent lazy Sunday morning was the perfect time to try my hand at this easy recipe for Baked Eggs in Ham Crisps. With only 2 ingredients, a muffin tin, and a can of cooking spray, my breakfast was in the oven in less than a minute. A cooking time of about 13 - 14 minutes gave me enough time to brew a pot of coffee, pour a glass of juice and toast 2 slices of bread.

Sliding the just cooked eggs which were cradled in ham out of the muffin tin, I decided that I may have a new go-to breakfast. The slightly browned ham is perhaps the perfect accompaniment to the slightly runny egg. Toast completes the meal.

I'll be having Baked Eggs in Ham Crisps at least once or twice in the next week. That is until I find a new recipe to replace it.


Baked Eggs in Ham Crisps
serves 1

2 thin slices of honey ham
2 large eggs
cooking spray
salt and pepper to taste

Preheat oven to 350 degrees. Spray 2 muffin cups with cooking spray and line with one ham slice each. Crack an egg into each ham cup. Bake for 12 - 15 minutes. Remove pan from oven and slide the egg filled ham crisps out of the pan and on to a plate. Season with salt and pepper. Serve immediately.

Coconut Crusted Flounder with Chili Orange Dipping Sauce


The sign of a great recipe is one that you want to make over and over again, and you never tire of eating it. Coconut Crusted Flounder with Chili Orange Dipping Sauce is one such recipe.

I prepared this recipe no less than three times yesterday - twice for clients and once at home. My personal cheffing clients can chose their weekly menu items from a list I provide them or they can suggest new items they want to try. My Tuesday client recently had dinner at a local restaurant and loved the lightly breaded coconut fish she had on a recent visit. She requested it for her next cookday and proclaimed the coconut crusted flounder I prepared was even better than the restaurant version. The addition of the sweet yet spicy dipping sauce put it over the top she said.

Coconut Crusted Flounder with Chili Orange Dipping Sauce is super easy to prepare and comes together quickly. This recipe will keep coming to the top of your recipe pile because you will want to make it often.

Coconut Crusted Flounder
adapted from a recipe on the Food Network

serves 5

canola oil
5 fish flounder filets, about 5 - 6 oz each
1 cup panko bread crumbs
1 cup shredded sweetened coconut
2 large eggs
Salt and freshly ground black pepper
1 cup all-purpose flour
1/2 teaspoon onion powder
1/2 teaspoon garlic powder

Chili Orange Dipping Sauce, recipe follows

Heat oil in a large saute pan over medium high heat.

In pie plate, combine the panko and coconut. In another pie plate, beat eggs and dash of salt and pepper. In a third pie plate, mix flour, onion and garlic powder together.

Dredge fish in flour, then eggs, then the panko/coconut.

Saute in batches, until crisp and golden brown; 3 - 4 minutes per side watching carefully so the coconut does nut burn. Drain on a paper towel-lined sheet tray. Serve hot with Chili Orange Dipping Sauce on the side.

Chili Orange Dipping Sauce:

1 (6-ounce) jar orange marmalade
1/4 cup Asian garlic chili sauce
1/2 lime, juiced

Mix all ingredients in a small bowl.

Note - when making this recipe ahead of time, reheat the fish on a baking sheet in a preheated 350 degree oven for about 10 minutes. This will insure the filets are crispy.


Share/Bookmark

Grilled Chicken Caprese


With the warm weather trying to break through the chilly Spring days, grilling is moving to the front and center as a primary method of cooking in our house. When grilling an entree, dinner gets to the table quickly and there is little to no clean up. A win-win.

Our family has a self-inflicted busy schedule. Whether watching a softball game, dropping off a kid or two at lacrosse practice, prepping for a personal chef client, or trying to figure out 7th grade math, our lives are full of mainly activities we enjoy. That is except for the 7th grade math. Easy recipes fit well with my dinner prep because after a day of cooking and the eventually taxi service around town, easy, tasty, and relatively healthy meals are key to a happy mom/chef and therefore family.

Grilled Chicken Caprese can be adapted to your family's taste preferences. No Thank You Boy likes the chicken. My daughters are fans of cheese and can't get enough of the melted goodness on the grilled chicken. The Husband and I enjoy the complete entree - balsamic marinated chicken that is grilled and topped with fresh mozzarella, charred tomatoes and chopped basil. This recipe is ideal for a family with many taste preferences.

Fire up the grill. Not only will your dinner be delicious, but you will be happy when dinner is over and there are no pots and pan to wash.

Grilled Chicken Caprese
serves 5

3/4 cup olive oil
1/4 cup balsamic vinegar
1 teaspoon Dijon mustard
1 garlic clove, finely chopped
1/2 teaspoon each basil and oregano
1/2 teaspoon salt
1/4 teaspoon pepper

2 pounds chicken tenderloins
1/2 pound fresh mozzarella, sliced
1 pint grape tomatoes
fresh basil, chopped

In a small bowl, whisk the first 7 ingredients. Set aside.

Place the chicken in a resealable bag and add about 3/4 of the marinade. Reserve the remaining marinade for basting the chicken while it grills. Marinate the chicken for at least an hour and up to 6 hours.

Heat a grill to medium high. Grill the chicken for about 3 - 5 minutes per side basting with the reserved marinade. During the last minute or 2 of grilling, top the chicken with the mozzarella to just melt. Remove to a serving platter. Meanwhile, quickly grill the tomatoes until slightly charred about 3 - 4 minutes. Remove to the platter with the chicken. Sprinkle with the basil and serve.

Roasted Salt and Pepper Garbanzo Beans


I like to snack.

Throughout the day, I try to eat healthy snacks so I can have a big bowl of ice cream or a few cookies with a glass of milk before heading off to bed. I don't like to go to bed on an empty stomach. Homemade trail mix with pecans, walnuts, dried cherries and semi sweet chocolate chips, granola bars, and cut up apples are just a few snacks I munch on during the day.

I am always on the lookout for a crunchy alternative to nuts. I stumbled upon a few articles and recipes that mentioned roasting garbanzo beans so I gave it a try. Garbanzo beans are also known as chickpeas and are commonly used in making hummus which is one of my favorite happy hour dips.

Roasted Salt and Pepper Garbanzo Beans are a crispy-crunchy snack that is delicious and nutritious. Nibble on a snack that is good for you while enjoying with a glass of wine.

Happy hour never had it so good.

Roasted Salt and Pepper Garbanzo Beans

2 (15-ounce) cans garbanzo beans or chickpeas
1 tablespoon olive oil
1 1/2 teaspoons salt
3/4 teaspoon pepper

Preheat oven to 425 degrees.

Drain garbanzo beans and rinse with cold water. Let sit in the stainer for 5 to 10 minutes so must of the water can drain off.

Line a large rimmed baking sheet with parchment paper and spread out the garbanzo beans. Drizzle with the olive oil and sprinkle with the salt and pepper. Roast in the oven for 35 - 45 minutes until crunchy and browned. Toss the garbanzo beans a couple times so they roast evenly. Taste the garbanzo beans half way through the roasting time and adjust the seasoning if necessary.

Remove from the oven and let cool. Serve.

Print recipe

Share/Bookmark


Beef Stew Bourguignon


I went to visit my sister last week. She lives in Minnesota on a farm with her husband, three kids, a dog, a cat, and their herd of cattle.

My sister has been battling breast cancer for the last 9 months. I would rather just visit her for fun, but I was there to help her with all the daily responsibilities of being a mom because the radiation treatments she has been getting for the past 5 weeks make her very tired.

Her refrigerator and freezer are now full of healthy lunches and dinners. I drove her to Mayo Clinic for her appointments so she could read the newspaper or take a nap during our 1 and 15 minute drive. My niece and I tried to find a dress for her upcoming confirmation ceremony, but unfortunately had no luck.

And I made my sister laugh. I spent my first 3 days on the farm mooing at the cattle and trying to convince them that I was their friend. I just wanted to see them up close. Every time I walked up to the cattle, they would scatter. My sister was confused at my mooing and staring at the livestock and later on confessed that she had no idea what I was doing. I explained that I just wanted to get a closer look at the cattle. She lead me to the barn and gave me a bucket of corn. The cattle came running! After my sister stopped laughing at me, she snapped a few photos as I fed my new friends.


I know she appreciates the help I gave her while I was visiting. As her sister, of course I would do whatever she needed me to do. But the best part of the visit was just hearing her laugh, even if she was laughing at me. During this long emotional and tiring roller coaster of a battle with cancer, it is good to have a laugh.

As the saying goes, laughter is the best medicine.


One of the dinners I made for my sister's family was Beef Stew Bourguignon. It is one of those dishes that tastes even better the next day.


Beef Stew Bourguignon

serves 6

8 slices of bacon, diced
olive oil
2 1/2 pounds of chuck roast, cut into large chunks
salt
pepper
1 pound organic baby carrots
1 large onion, diced
3 garlic cloves, chopped
1 cup red wine
2 cups beef broth, low fat and low sodium
1 teaspoon thyme
2 tablespoons butter
3 tablespoons flour
1 pound button mushrooms, quartered and sauteed

Heat a large Dutch oven and add the bacon. Cook over medium heat for 10 minutes, stirring occasionally, until the bacon is lightly browned. Remove the bacon with a slotted spoon to a large plate.

Add enough oil to the dutch oven to equal about 2 tablespoons. Sprinkle the beef cubes with salt and pepper. In batches in single layers, sear the beef for 3 to 5 minutes, turning to brown on all sides. Remove the seared cubes to the plate with the bacon and continue searing until all the beef is browned. Set aside.

Add the carrots and onions to the dutch oven and cook for 10 to 15 minutes, stirring occasionally, until the onions are lightly browned. Add 2 teaspoons salt and 1 teaspoon pepper and the garlic and cook for 1 more minute. Add the wine and bring to a boil. Put the meat and bacon back into the pot with the juices. Add the beef broth and thyme. Reduce to a simmer and cover the pot with a tight-fitting lid. Cook on the stovetop for about 1 hour and 45 minutes to 2 hours or until the meat and vegetables are very tender when pierced with a fork.

Combine 2 tablespoons of butter and the flour with a fork and stir into the stew. Add the sauteed mushrooms. Continue simmering the beef stew until the gravy thickens slightly. Season to taste.

Print recipe

Share/Bookmark


Crock Pot Italian Beef Sandwiches

Crock Pot Italian Beef Sandwiches
Tailgate - [teyl-geyt] adjective - relating to or pertaining to a picnic set up on a tailgate.

Who would think that eating and drinking in a parking lot surrounded by rows and rows of cars, buses, and RVs could be so much fun?! Food tastes better and a cold beer is that much more thirst quenching when served out of the back of your car while enjoyed with good friends at a sporting event on the outskirts of a huge sports arena.

Spending an afternoon and evening at a college lacrosse tournament, the highlight for me was the tailgate. My contribution to the parking lot picnic was Crock Pot Italian Beef Sandwiches. Thin sliced deli roast beef is combined with roasted red peppers, peppperoncinis, dried thyme and oregano and beef stock. If you are in a hurry, just a couple hours on High are all that is needed to make these satisfying sandwiches which taste like you spent all day preparing them. To make your sandwich more parking lot-worthy, add a generous squirt of Kraft Sharp Cheddar Easy Cheese

Eating out of the back of your car never tasted so good.

No cheese, please.

Crock Pot Italian Beef Sandwiches

serves 12

3 pounds of thin sliced deli roast beef
4 cups of beef stock
1 teaspoon dried thyme
1 teaspoon dried oregano
1 jar (12 ounce) sliced pepperoncinis
1 jar (12 ounce) sliced roasted red peppers
12 long rolls, split
1 can Kraft Sharp Cheddar Easy Cheese

Place all the ingredients in crock pot and stir to evenly distribute. Set crock pot to High and cook for 2 - 3 hours or set to Low for 5 - 6 hours.

To serve, put a generous amount of the beef and peppers into a roll and drizzle with the broth. Squirt cheese on top if desired.

Herb and Balsamic Steak Kebabs


Eating food on a stick is fun. No Thank You Boy will eat twice as much food if I serve it on a skewer. I have made Thai Chicken Tenderloin Satay no less than 5 times this month for my clients and family. And that does not include the numerous Beef Kebabs with Roasted Red Pepper Dipping Sauce and a new client favorite of Herb and Balsamic Steak Kebabs I have prepared this month.

I am officially declaring March the Month of the Kebab.

After mixing up the marinade, add the cubed sirloin steak so it can soak up the herb, balsamic, and Dijon mustard flavors. Thread the beef onto bamboo skewersalong with some peppers and red onion wedges followed by a quick roasting in a hot oven or on the grill is all that is needed for a great dinner. Add a brown rice pilaf with sauteed leeks and peas and you will be eating a delicious dinner with a minimum of fuss.

Dinners for a Year and Beyond. Helping families get back to the dinner table one recipe at a time.


Herb and Balsamic Steak Kebabs
serves 4, 2 kebabs per person

2 large garlic cloves, chopped
2 tablespoons balsamic vinegar
1 tablespoon olive oil
juice of 1/2 lemon
1 tablespoon Dijon mustard
1 tablespoon Worcestershire sauce
2 tablespoons soy sauce
1/2 teaspoon each dried oregano, basil, and thyme
1 1/2 pounds sirloin steak, cubed
1 red pepper, cut in 1-inch pieces
1 green pepper, cut in 1-inch pieces
1 red onion, cut in 1-inch pieces
8 bamboo skewers

Preheat oven to 450 degrees.

In a small bowl, combine the garlic, balsamic vinegar, olive oil, lemon juice, Dijon mustard, Worcestershire sauce, soy sauce, oregano, basil, and thyme. Place the steak in a large resealable bag and add all but 2 - 3 tablespoons of the marinade. Set reserved marinade aside. Let the steak marinate in the refrigerator for 2 - 6 hours.

Thread meat alternately with the peppers and onion on the skewers. Baste the kebabs with the reserved marinade. Place on a broiler pan and roast in oven for about 4 - 5 minutes per side. During the last couple minutes of cooking, turn the oven to broil to slightly char the kebabs.

Remove from oven and let sit covered for 5 minutes before serving.

Note - alternately, the kebabs can be grilled on an outdoor grill for 4 - 5 minutes per side.

Sugared Shortbread


Cookies are an important time of my day. With coffee for breakfast. As a pick me up in the late afternoon. And a couple with a shot of milk before bed make for a good night's sleep.

I was introduced to Sugared Shortbread by my neighbor and good friend Kathleen. She can brew a pot of coffee and have a tasty baked good ready at a moment's notice. Even if I stop by unannounced. These buttery, dense treats are melt-in-your mouth delicious and include rice flour as an ingredient. Rice flour is available at your local grocery store in the baking aisle or can be bought online. One brand I typically use is Bob's Red Mill White Rice Flour. Or make your own rice flour by grinding white rice in a coffee bean grinder.


If you start a batch of Sugared Shortbread now, it will be ready for when that next cookie attack hits.


Sugared Shortbread

makes 32 cookies

2 cups flour
1/4 cup rice flour such as Bob's Red Mill White Rice Flour *
1/4 cup sugar plus more for sprinkling on top
1 cup butter, melted and cooled

Preheat oven to 350 degrees. Line the bottom of a 8 x 8 inch baking pan with parchment paper. Set aside.

Combine the flour, rice flour and sugar. Stir in the melted butter. Add a little more flour if needed for the dough to be a firm consistency. Press into prepared pan to a thickness of about 1 inch.

Bake for about 40 - 45 minutes or until the shortbread is evenly golden brown. Cut immediately into cookie sticks and sprinkle generously with the extra sugar. Cool completely before removing from pan.

* note - rice flour can be made by grinding white rice in a clean coffee grinder.